lunes, 28 de noviembre de 2011

3rd Practical Assignment - Firewall

En esta publicacion voy a explicar como es que fue implementado un firewall muy simple en nachos.

Para empezar nuestra idea era implementar una lista donde se añadieran algunos datos que nos servirian como referencia para bloquear aplicaciones o paquetes, pero aunque teniamos una clase lista en la carpeta threads esta estaba implementada como una cola, asi que lo modificamos y agregamos dos métodos los cuales son los siguientes.

Una vez que ya teniamos las herramientas, empezamos a implementar el firewall el cúal se encarga de bloquear direcciones puesto que nachos ya tiene implementados paquetes con datos y direcciones.


El firewall se conforma con dos listas: una para las direcciones bloqueadas  y otra para las direcciones que se consideran de confianza. Para su funcionamiento se añaden direcciones a las listas y despues se verifica que esten en un grupo u otro, la implementacion es la siguiente:


Empecemos a analizarlo. Los siguientes dos métodos se encargan de añadir y eliminar elementos de la lista de direcciones de confianza. Para añadir elementos primero se verifica que no exista la dirección en la lista y de ser así la añade al final de la misma. Para eliminar elementos lo que hace es verificar que estos se encuentren en la lista y si es asi busca su posicion y los elimina.


La parte siguiente funciona de forma analoga con la anterior solo que esta se encarga de administrar las direcciones bloqueadas.


Por último los dos métodos siguientes se encargan de verificar que las direcciones se encuentren en las listas ya sea de bloqueo o de confianza. Recibe como parametro la cabecera de un paquete, y utiliza la dirección de origen de este para buscar en las listas.


Para probar el firewall utilizamos una clase que ya viene por defecto en nachos donde se prueba la network mandando dos paquetes entre dos sistemas diferentes, tomamos  este codigo, instanceamos el código y añadimos direcciones a las listas, como se muestra aquí:


Despues añadimos los filtros del firewall, utilizando sus métodos para verificar si el paquete es de confianza o bloqueado.


El resultado fue el siguiente:

En este caso el paquete en el cúal estaba bloqueada la direccion 148 fue bloqueado con exito.

En el caso en el  que la direccion 148 era la única de confianza, el otro paquéte fue bloqueado.


Buen día.

domingo, 27 de noviembre de 2011

3rd Practical Assignment - Encryption

Hi, in this post I'll explain how does our encryption algorithm work in NachOS.

The algorithm we used is RC4, a formal definition of the algorithm is:

"RC4 is a stream cipher designed by Rivest for RSA Data Security (now RSA Security). It is a variable key-size stream cipher with byte-oriented operations. The algorithm is based on the use of a random permutation. "

Before adding code to NachOS, we'd already tested the algorithm in python, using the following code:
#! usr/bin/python  
  
class RC4:  
  
 def __init__(self:(  
  print 'RC4'  
  self.S=[]  
  
 def ksa(self, llave:(  
  self.S = range(256) # crea un vector de 256 numeros  
  j=0  
  for i in range(0,256:(  
                        # Escoje dos números para mezclarlos usando los números de  
                        # la llave como semilla. En este caso los caracteres de la  
                        # llave se convierten en un numero entero usando ascci.  
   j = ( j + ord(llave[ i % len(llave)]) + self.S[i] ) % 256  
   (self.S[i], self.S[j] ) = ( self.S[j], self.S[i] )  
  
 def prga(self, texto:(  
  temp = ""  
  j = 0  
  for i in range(len(texto):(  
                        # Utiliza la llave de 256 numeros para crifrar el texto.  
   j = (j + self.S[i+1]) % 256  
   (self.S[i+1], self.S[j] ) = ( self.S[j], self.S[i+1])  
                        # La variable temp se usa para guardar el resultado del  
                        # crifrado y convertir el número a hexagesimal  
   temp = temp + hex(self.S[(self.S[i+1] + self.S[j])%256]^ord(texto[i])).split('x')[1]  
  print "%s -> %s"%(texto, temp)  
  
  
rca = RC4()  
rca.ksa("LLave")  
print "key -> LLave"  
rca.prga("Este texto es muy importante") 

And with that tested, we proceeded to program it in C++. To do that, we added new files to the NachOS Makefile in order for it to compile with all NachOS. We called them encrypt.cc and encrypt.h. In encrypt.h we just defined the method prototypes and the class itself. The code looks like this:

class Encrypt{
 public:
  //Destructor not used
  ~Encrypt();
  //Constructor, takes a key and a string to convert.
  Encrypt(char *key, char *str);
  //Method to swap places in an array of characters.
  void swap(char *s, unsigned int i, unsigned int j);
  //Method to do the key scheduling algorithm
  void ksa(char *key, unsigned int key_length);
  //Method to do the pseudo-random generation algorithm
  char prga();
};

So that's the header file, now the .cc file in which all the methods are elaborated, contains the previous defined methods in the header file:


  • swap: method to swap values from the S array.
  • ksa: method that initializes the array, and does the key-scheduling algorithm to generate a key from a given string.
  • prga: method that does the pseudo-random generation algorithm, which pretty much mixes the array with the previously generated key and outputs the keystream
The code is the following:

#include 
#include 
#include "encrypt.h"

char S[256];
unsigned int i, j;
#define ARRAY_SIZE(a) (sizeof(a)/sizeof(a[0]))
Encrypt::Encrypt(char *key, char *str){
    unsigned int x;
    char *string;
    char contenido[100];
    unsigned int y;
        this->ksa(key, strlen((char*)key));
        printf("\nKey: %s, Message: %s\nEncrypted Message: \n", key, str);
        for (y = 0; y < strlen((char*)str); y++){
        printf("%x", (str[y] ^ this->prga()));
     }
    printf("\n\n");
}
void
Encrypt::swap(char *S, unsigned int i, unsigned int j) {
    char temp = S[i];
    S[i] = S[j];
    S[j] = temp;
}
void
Encrypt::ksa(char *key, unsigned int key_length) {
    for (i = 0; i < 256; i++)
        S[i] = i;
    for (i = j = 0; i < 256; i++) {
        j = (j + key[i % key_length] + S[i]) & 255;
        swap(S, i, j);
    }
    i = j = 0;
}
char
Encrypt::prga() {
    i = (i + 1) & 255;
    j = (j + S[i]) & 255;
    swap(S, i, j);
    return S[(S[i] + S[j]) & 255];
}

So, now to call our class, there are two things we did, first one, initialize an object in main and give the parameters there, so we can test it running nachos. The second one, which I'm going to explain, is to test it directly with the messages used in the nettest.cc file in the network directory.

To do this, we needed to import encrypt.h in the nettest.cc file. With that done, we just created an object in the MailTest function with the syntax: Encrypt *encrypt. Then we modified the messages just to test with something different, and used the encryption algorithm with them.

Compiling everything from the beginning gave this output:

With everything compiled and ready, we proceeded to execute two nachos machines to connect them with the simulated network, with the commands: ./ -m 0 -o 1 & ./ -m 1 -o 0 & (each one in a different terminal, but I understand it can be done in the same one).

That gave us the following output:


Which as we can see, its a little odd, because it adds some F's to the keystream. We couldn't fix that but we think the reason was because we used a char * instead of an unsigned char * for the key and the string parameters, but using unsigned char * just caused a lot of errors to pop out, so we couldn't change it.

Anyway, removing the F's we can see the output is the same as the python output with the same message and key:


And that's it, if you have any suggestion or question feel free to comment.:)


jueves, 17 de noviembre de 2011

3rd Theoretical Presentation

3rd Theoretical Assignment - Security

Security has been always probably the most important thing a computing system must offer to its users. Through evolution of computing systems the principal or most important goal of the security is prevent misuse of computers.

Three fundamental pieces to security are:
- Authentication -- who user is
- Authorization -- who is allowed to do what
- Enforcement -- make sure people do only what they are supposed to do

For Authentication we use passwords, which are "secrets" between two parties, your computer and you with a password the machine can assume that it's me who are in the controls.

The system keep always a copy of this "secrets" but what could happen if a malicious user gains access to that list of passwords?

A possible solution to this problem is encryption - transformation that is difficult to reverse without the right key.

There are two roles for encryption:
a. Authentication.
b. Secrecy -- I don't want anyone to know this data.

Private key encryption


Private key: use an encryption algorithm that can be easily reversed, given the correct
key and hard to reverse without the key.


As long as password stays secret, get both secrecy and authentication.
But how do you get shared secret in both places?

Server keeps list of passwords, provides a way for two parties, A,B to talk to one another, as long as they trust server.


Notation:
"Kxy" is a key for talking between "x" and "y".
        (text)"^K" means, encrypt message (text) with key "K".

//A asks server for key
        A -> S  ("Hi! I'd like a key for A,B")

//Server gives back special "session" key encrypted in B's key:
        S -> A(Use Kab ("This is A!" Use Kab)^Ksb)^Ksa

//A gives B the ticket:
        A -> B("This is A!" Use Kab)^Ksb 

Public key encryption

Public key encryption is an alternative to private key: separates authentication from secrecy.

Each key is a pair: K-public, K-private

With private key system:
(text)^K = ciphertext
          (ciphertect)^K = text


With public key system:
(text)^K-public = ciphertext
            (ciphertext)^K-private = text
      and:
            (text)^K-private = ciphertext'
            (ciphertext')^K-public = text
      and:
            (ciphertext)^K-public != text
            (ciphertext')^K-private != text
      
      and: cant' derive K-public from K-private or vice versa.

The idea is
/*K-private kept secret. 
K-public put in a public directory.*/
For example:
("I'm tom!") ^ K-private
                          //Everyone can read it, but only I can send it (authentication)
            ("Hi!") ^ K-public
                          //Anyone can send it, but only the target can read it (secrecy)

In other words
(("I'm tom!")^K-private "Hi!")^K-public  
//Only I can send it, only you can read it.

Some symmetric-key algorithms:
  • DES
  • 3DES
  • AES
  • IDEA 
  • SEAL 
  • RC4
  • RC6
  • Blowfish 
Some asymmetric or public-kay algorithms:
  • RSA
  • Diffie-Hellman
  • ElGamal
  • Elliptic curves

For example purposes we made an implementation in python of the RC4 algorithm, one of the most used encrypt algorithms in protocols like:
TLS/SSL, WEP y WPA.

This algorithm uses a vector with 256 numbers and is divided in two parts, first part mix the numbers of the vector using a key as roth creating an intermedium key of
256 numbers; second part uses the vector to encrypt data mixing and interchanging the numbers.


#! usr/bin/python

class RC4:

 def __init__(self:(
  print 'RC4'
  self.S=[]

 def ksa(self, llave:(
  self.S = range(256) # crea un vector de 256 numeros
  j=0
  for i in range(0,256:(
                        # Escoje dos números para mezclarlos usando los números de
                        # la llave como semilla. En este caso los caracteres de la
                        # llave se convierten en un numero entero usando ascci.
   j = ( j + ord(llave[ i % len(llave)]) + self.S[i] ) % 256
   (self.S[i], self.S[j] ) = ( self.S[j], self.S[i] )

 def prga(self, texto:(
  temp = ""
  j = 0
  for i in range(len(texto):(
                        # Utiliza la llave de 256 numeros para crifrar el texto.
   j = (j + self.S[i+1]) % 256
   (self.S[i+1], self.S[j] ) = ( self.S[j], self.S[i+1])
                        # La variable temp se usa para guardar el resultado del
                        # crifrado y convertir el número a hexagesimal
   temp = temp + hex(self.S[(self.S[i+1] + self.S[j])%256]^ord(texto[i])).split('x')[1]
  print "%s -> %s"%(texto, temp)


rca = RC4()
rca.ksa("LLave")
print "key -> LLave"
rca.prga("Este texto es muy importante")

The result of encrypt "Este texto es muy importante" unsing "Llave" as key is:


Firewall


[image obtained from: "http://www.itconsultingcrew.com/wp-content/uploads/2010/08/firewall.gif"]


A firewall is a secure and trusted machine that sits between a private network and a public network. The firewall machine is configured with a set of rules that determine which network traffic will be allowed to pass and which will be blocked or refused. In some large organizations, you may even find a firewall located inside their corporate network to segregate sensitive areas of the organization from other employees. Many cases of computer crime occur from within an organization, not just from outside.

Firewalls can be constructed in quite a variety of ways. The most sophisticated arrangement involves a number of separate machines and is known as a perimeter network. Two machines act as "filters" called chokes to allow only certain types of network traffic to pass, and between these chokes reside network servers such as a mail gateway or a World Wide Web proxy server. This configuration can be very safe and easily allows quite a great range of control over who can connect both from the inside to the outside, and from the outside to the inside. This sort of configuration might be used by large organizations.

Typically though, firewalls are single machines that serve all of these functions. These are a little less secure, because if there is some weakness in the firewall machine itself that allows people to gain access to it, the whole network security has been breached. Nevertheless, these types of firewalls are cheaper and easier to manage than the more sophisticated arrangement just described. Next figure illustrates the two most common firewall configurations.


[image obtained from "http://tldp.org/LDP/nag2/lag2_0901.jpg"]


Access Control

Control access to data is fundamental for security purposes of computing systems. Access rights are a useful technique to control access that a user may have for see, manipulate or modify some data or information.

Most common access rights are:
  • Reading access.
  • Writing access.
  • Execution access.
One way to implement this, is by an access control matrix with the following parameters:
  • Rows for users.
  • Columnsfor data.
  • Cell for access rights a user has to use an object.

[image obtained from: "http://1.bp.blogspot.com/-5INwDsGP56A/ThvjuNMu24I/AAAAAAAAABA/X4vOcTIQ_iY/s1600/sp.jpg"]


References:
http://librosnetworking.blogspot.com/2009/10/protocolos-de-encriptacion.html
http://exa.unne.edu.ar/depar/areas/informatica/SistemasOperativos/SO14.htm
http://tldp.org/LDP/nag2/x-087-2-firewall.introduction.html

3rd Theoretical Assignment - Networking Chat Room

Hi, here I'll explain how we are planning to implement our chat or chat room program, for our NachOS 3rd Practical Assignment.

First, I'll explain some of the files that we'll probably going to modify. To explain, I'll use this diagram:


This diagrams, explains the start of the nettest process from the beginning. It all starts in the main.cc, where the code there manages some of the command line flags(in our case we're interested in '-o', to select the destination machine). So when we execute ./nachos -m 0 -o 1, the main's going to manage what's going to happen with the -o 1 part, and system.cc-system.h(who has the rest of the command line flag management) is going to manage the -m 0 part.

With that command, the main is going to execute the MailTest function in the nettest.cc file. Which then is going to define a PacketHeader(defined in the network.h file). The network.cc-network.h files will manage the simulation of the physical connection, and is going to work together with the sysdep.h-sysdep.cc to use the socket operations defined there.

And then to send and receive messages trough this sockets, nettest is going to use post.cc-post.h which creates an abstraction of a message delivery and methods to send and receive messages.

Now that's for a send-receive message delivery, which is pretty interesting, but it is already implemented, so how can we use it?. I think we can abstract this idea more, to the point of converting this on a chat room.

A chat room would be something like this:

Where all the chat clients are going to communicate to each others using the chat server as a medium.
This means, if chat client 1, wants to send a message to the other chat clients, chat client 1 has to send this message to the chat server, and then the chat server will broadcast this message to all the chat clients connected in this network. For this we could use the word YELL. Imagine a chat with three people: Emmanuel, John, and Jane, an example with YELL would be:

<Emmanuel>: YELL 'Hi everyone'
//In Emmanuel's, John's and Jane's screen:
OUTPUT: <Emmanuel> - 'Hi everyone'

So a pseudocode that explains better this operations:

YELL( msg):
  //source machine sends the message to server
   outPktHdr.to = serverAddr;
   outMailHddr.to = mailboxNum;
   outMailHddr.from = machineID;
   send(outPktHdr, outMailHddr, msg);
                        . . .
    //server recieves it
   receive(0, &inPktHdr, &inMailHdr, buffer);
  //broadcast to every client (in a list maybe?)
   broadcast(buffer);
                        ...
   receive(0, &inPktHdr, &inMailHdr, buffer);
   Print(“OUTPUT: :  %s”, msg);
Another option would be to send a private message, or a whisper. This is, a message from chat client 1 to chat client 2 only. This would mean, chat client 1 sends the message to the server, and then the server sends it to the chat client 2 only. So it would be something like:

<Emmanuel>: WHISPER <Jane> 'Sup Jane?'
//In Jane's screen:
OUTPUT:  WHISPER FROM <Emmanuel> - 'Sup Jane?'
And a pseudocode to explain this:
whisper(machineID, destinationID , msg){
  //source machine sends a message to server
   outPktHdr.to = serverAddr;
   outMailHddr.to = mailboxNum;
   outMailHddr.from = machineID;
   send(outPktHdr, outMailHddr, msg);
             . . .
    //server recieves it
   receive(0, &inPktHdr, &inMailHdr, buffer);
   outPktHdr.to = destinationID;
   outMailHddr.to = mailboxNum;
   outMailHddr.from  = machineID;
   send(outPktHdr, outMailHddr, msg);
   //destination receives it
   receive(0, &inPktHdr, &inMailHdr, buffer);
   Print(“OUTPUT: WHISPER FROM <nickname>:  msg”);

And that's how we think that operations are done, of course they need to work with a certain protocol to work best, in which case we are going to use the ones defined in this webpage:

Any doubts or suggestions feel free to comment. :)

miércoles, 16 de noviembre de 2011

3rd Theoretical Assignment - NachOS Networking

For our NachOS 3rd assignment we were asked to implement some network, and security stuff, and for that NachOS already has some code from to start implementing our own userprogs.

First of all, in the nachos/code/network directory, there are two interesting files, post.h-post.cc, which simulates a fixed-size message delivery, which I think they can be modified for other uses, for example, creating a chat.

The code from post.h defines some important classes to simulate this matter (implemented in post.cc), but for understanding purposes I'll show post.h code(which is also smaller because there are just definitions of methods).
  • 'MailHeader', which contains some needed information to send the message, like destination address, the sender's address and the bytes of data from the message:
  
class MailHeader {
  public:
    MailBoxAddress to;  // Destination mail box
    MailBoxAddress from; // Mail box to reply to
    unsigned length;  // Bytes of message data (excluding the
    // mail header)
};
As we see, there is nothing really complicated in that, every mail in real life include the first two, the other one, is the size of the message (apparently in a single message data can only be size : MaxMailSize = MaxPacketSize - sizeof(MailHeader) )
  • 'Mail' which defines the mail itselfs, and it's format. It contains information like and array of characters(length = MaxMailSize) and some other information appended by the 'PostOffice'(explained later on) or the Network.
  
class Mail {
  public:
     Mail(PacketHeader pktH, MailHeader mailH, const char *msgData);
    // Initialize a mail message by
    // concatenating the headers to the data

     PacketHeader pktHdr; // Header appended by Network
     MailHeader mailHdr; // Header appended by PostOffice
     char data[MaxMailSize]; // Payload -- message data
};
Here is a little more complicated to imagine how things work, the MailHeader part is the same that the one explained before, the mail will contain in it's header: the destination address, and the sender's address and the length of the message, but the third one is a little more complicated because the PacketHeader is defined in another class, but we'll see about later.

  • 'MailBox' defines a single and temporary storage, to store the received messages. The incoming messages are stored in the appropriate 'MailBox' by the 'PostOffice', these messages can be retrieved from threads on the running machine.
  
class MailBox {
  public: 
    MailBox();   // Allocate and initialize mail box
    ~MailBox();   // De-allocate mail box

    void Put(PacketHeader pktHdr, MailHeader mailHdr, const char *data);
       // Atomically put a message into the mailbox
    void Get(PacketHeader *pktHdr, MailHeader *mailHdr, char *data); 
       // Atomically get a message out of the 
    // mailbox (and wait if there is no message 
    // to get!)
  private:
    SynchList *messages; // A mailbox is just a list of arrived messages
};
So this 'MailBox' is the one in charge of putting messages in a temporary storage(volatile), and retrieving them for further use. Here I think(theoretically speaking) we could use both methods to retrieve messages and write them, to program a chat.

  • Last but not least, the class 'PostOffice', which defines a collection of several mailboxes. So this class is a synchronization object with the operations Send and Receive. With synchronization it came to mind the 1st NachOS assignment(Locks, Condition Variables, Semaphores), and I remember that a while ago I read in some webpage something about Locks, Semaphores and Condition Variables needed to implement networking stuff. And here, we see that was true.
  
class PostOffice {
  public:
    PostOffice(NetworkAddress addr, double reliability, int nBoxes);
     // Allocate and initialize Post Office
    //   "reliability" is how many packets
    //   get dropped by the underlying network
    ~PostOffice();  // De-allocate Post Office data
    
    void Send(PacketHeader pktHdr, MailHeader mailHdr, const char *data);
        // Send a message to a mailbox on a remote 
    // machine.  The fromBox in the MailHeader is 
    // the return box for ack's.
    
    void Receive(int box, PacketHeader *pktHdr, 
  MailHeader *mailHdr, char *data);
        // Retrieve a message from "box".  Wait if
    // there is no message in the box.

    void PostalDelivery(); // Wait for incoming messages, 
    // and then put them in the correct mailbox

    void PacketSent();  // Interrupt handler, called when outgoing 
    // packet has been put on network; next 
    // packet can now be sent
    void IncomingPacket(); // Interrupt handler, called when incoming
       // packet has arrived and can be pulled
    // off of network (i.e., time to call 
    // PostalDelivery)

  private:
    Network *network;  // Physical network connection
    NetworkAddress netAddr; // Network address of this machine
    MailBox *boxes;  // Table of mail boxes to hold incoming mail
    int numBoxes;  // Number of mail boxes
    Semaphore *messageAvailable;// V'ed when message has arrived from network
    Semaphore *messageSent; // V'ed when next message can be sent to network
    Lock *sendLock;  // Only one outgoing message at a time
};

And thats the post.h code, which defines the message delivery. 

And now continuing, in the nachos/code/machine directory, there are some other classes used in the NachOS network. The first one is network.h-network.cc which manages the simulation of the physical network connection . In the network.h file we can see some interesting stuff as the:
  
typedef int NetworkAddress;

This network address is the machine's ID, which is specified when we execute nachos with the command ./nachos -m 1 -o 0 (command used to test the message delivery, first number is the machine's ID, second is the destination machine's ID).

And the previously mentioned 'PacketHeader' is also defined in this file, which is similar to the 'MailHeader' but instead of containing a 'MailBox' address, it contains a 'NetworkAddress' like the previously explained, for the source and destination machines. 

And finally, the 'Network' class, which simulates a physical network device which sends fixed-size packages to machines connected in this simulated network. Also there's is a reliability number to determine the chances of a packet to lose. A random number is used to determine which packet will be dropped.
  
class Network {
  public:
    Network(NetworkAddress addr, double reliability,
     VoidFunctionPtr readAvail, VoidFunctionPtr writeDone, void* callArg);
    // Allocate and initialize network driver
    ~Network();   // De-allocate the network driver data
    
    void Send(PacketHeader hdr, const char* data);
        // Send the packet data to a remote machine,
    // specified by "hdr".  Returns immediately.
        // "writeHandler" is invoked once the next 
    // packet can be sent.  Note that writeHandler 
    // is called whether or not the packet is 
    // dropped, and note that the "from" field of 
    // the PacketHeader is filled in automatically 
    // by Send().

    PacketHeader Receive(char* data);
        // Poll the network for incoming messages.  
    // If there is a packet waiting, copy the 
    // packet into "data" and return the header.
    // If no packet is waiting, return a header 
    // with length 0.

    void SendDone();  // Interrupt handler, called when message is 
    // sent
    void CheckPktAvail(); // Check if there is an incoming packet

  private:
    NetworkAddress ident; // This machine's network address
    double chanceToWork; // Likelihood packet will be dropped
    int sock;   // UNIX socket number for incoming packets
    char sockName[32];  // File name corresponding to UNIX socket
    VoidFunctionPtr writeHandler; // Interrupt handler, signalling next packet 
    //      can be sent.  
    VoidFunctionPtr readHandler;  // Interrupt handler, signalling packet has 
    //  arrived.
    void* handlerArg;  // Argument to be passed to interrupt handler
    //   (pointer to post office)
    bool sendBusy;  // Packet is being sent.
    bool packetAvail;  // Packet has arrived, can be pulled off of
    //   network
    PacketHeader inHdr;  // Information about arrived packet
    char inbox[MaxPacketSize];  // Data for arrived packet
};

The socket management is defined in the sysdep.h-sysdep.cc files, here we can see some functions used to open a socket where other NachOS machines can send messages, close a socket, initialize a socket, send a packet to another NachOS port, etc.
  
int
OpenSocket()
{
    int sockID;
    
    sockID = socket(AF_UNIX, SOCK_DGRAM, 0);
    ASSERT(sockID >= 0);

    return sockID;
}

void
CloseSocket(int sockID)
{
    (void) close(sockID);
}
static void 
InitSocketName(struct sockaddr_un *uname, const char *name)
{
    uname->sun_family = AF_UNIX;
    strcpy(uname->sun_path, name);
}
void
ReadFromSocket(int sockID, char *buffer, int packetSize)
{
    int retVal;
//    Comentado para evitar error de compilacion Red Hat 9 (2004)    
 // extern int errno;
    struct sockaddr_un uName;
    int size = sizeof(uName);
   
    retVal = recvfrom(sockID, buffer, packetSize, 0,
       (struct sockaddr *) &uName,(socklen_t*) &size);

    if (retVal != packetSize) {
        perror("in recvfrom");
//        Comentado para evitar error de compilacion Red Hat 9 (2004) 
    //   printf("called: %x, got back %d, %d\n", buffer, retVal, errno);
    }
    ASSERT(retVal == packetSize);
}

void
SendToSocket(int sockID, const char *buffer, int packetSize, const char *toName)
{
    struct sockaddr_un uName;
    int retVal;

    InitSocketName(&uName, toName);
#ifdef HOST_LINUX
    retVal = sendto(sockID, buffer, packetSize, 0,
     (const struct sockaddr *) &uName, sizeof(uName));
#else
    retVal = sendto(sockID, buffer, packetSize, 0,
     (char *) &uName, sizeof(uName));
#endif
perror("ERROR HERE");
    ASSERT(retVal == packetSize)

}

So here we could implement some functions to block a certain socket, or something like that.

Testing the network:

To test the message delivery in NachOS, we can as easy as(provided NachOS is already compiled):
  • Go to the nachos/code/network directory.
  • Open two command lines.
  • In one run:
    • ./nachos -m 0 -o 1 &
  • In the other:
    • ./nachos -m 1 -o 0 &
This should produce some output like this:

Output from: ./nachos -m 0 -o 1 &:


Output from: ./nachos -m 1 -o 0 &:


Note 1: For this, you need to already have the condition variables implemented correctly or else, it won't work.

Note 2: For this test, we had problems with Segmentation Faults, and Asserts, we couldn't tell what was the problem until we used GDB, to track where our NachOS was failing. You can check a post we did on how to use GDB, here.

And that's it. All of this(and some more) is already in our NachOS distribution, and we're going to work with this, to try and implement our own networking userprog.

Any doubts or suggestions feel free to comment.

GDB for debugging NachOS

Hi there, on this post I'll explain how we used the GDB debugger to find some errors in our NachOS.

We used GDB to find which program was causing a Segmentation Fault, which we kept getting from trying to execute two NachOS machines in two different command lines, one with: ./nachos -m 0 -o 1 &  and the other with: ./nachos -m 1 -o 0 &, this was done to test the network.

First of all, what is GDB?

"GDB, the GNU Project debugger, allows you to see what is going on `inside' another program while it executes -- or what another program was doing at the moment it crashed.
GDB can do four main kinds of things (plus other things in support of these) to help you catch bugs in the act:
  • Start your program, specifying anything that might affect its behavior.
  • Make your program stop on specified conditions.
  • Examine what has happened, when your program has stopped.
  • Change things in your program, so you can experiment with correcting the effects of one bug and go on to learn about another.
The program being debugged can be written in Ada, C, C++, Objective-C, Pascal (and many other languages)."

You can check if you already have GDB using: which gdb, on the command line. If you don't you can install it with a simple: sudo apt-get install GDB.

Example run:

Now, the important part, using it. As the description says, GDB can debug C++ programs, so we decided to use it to see if it really works, and find what in NachOS was causing that Segmentation Fault.

Like said before, there were two different machines running at the moment in two command lines, one would get a Segmentation Fault, and other an Assertion Failed. The first one to run, would be getting a Segmentation Fault, and the second an Assertion Failed, always in that order.

Segmentation Fault:
And the Assertion Fault:

So, to find the culprit, we first run gdb, executing gdb in both command lines for the NachOS executable using:  gdb nachos.


And then we run in one  ./nachos -m 0 -o 1   and the other with: ./nachos -m 1 -o 0 . This was important because if we just executed one, the conditions in which the error occurred wouldn't be the same. 

This produced the following output:


So as we can see there, gdb is telling us:
 The program received a Segmentation Fault in Lock::IsHeldByCurrentThread at 
../threads/synch.cc: 117
117       return lockHolder = currentThread;

Its telling us which line, which method, and which file caused it. So we proceeded to fix that:
Changing line:      return lockHolder = currentThread;
To:                        return lockHolder;
(Yes, as simple as that)

After modifying that, we compiled NachOS again, and proceeded to try again to test the NachOS network again, and the output was:

The message worked in both machines, and no more Segmentation Faults were produced.

And now, maybe late, we realize the importance of debugging, because at the 1st Assignment we kept getting Segmentation Faults, without realizing which program was causing, so now onward we know how to tell.

So, that's all for this post, if you have any doubts or suggestions feel free to comment. :)

sábado, 5 de noviembre de 2011

2nd Practical Assignment - Replacement Algorithm(Nachos)

Searching in the internet we found an article about virtual memory in nachos. This article explained some features of virtual memory, and how to handle them in nachos, so we based in this to try our own Page Replacement algorithm.

The important thing we learned there: the page replacement algorithm should be called when a PageFaultException is raised, so we had to modify some stuff at the "exception.cc" file (found in the userprog directory). Here we needed to handle what was going to happen when a PageFaultException was raised (the exception already existed), so we added the next lines:
  
void
ExceptionHandler(ExceptionType which)
{
    /If the exception type is a PageFaultException, call the PageFault function.
    if(which == PageFaultException){
 DEBUG('a', "Page Fault.\n");
 PageFault();        
    }
}

This will execute the PageFault function when a PageFaultException is raised, so when this happens the page replacement algorithm should also execute.

The PageFault function code will first get the page that caused the Page Fault, which is stored at the register, then call the Select_Out method from the PageReplacement class, this method takes as parameters the page which caused the exception and the address space of the current thread. Then after the algorithm was executed, the PageFault function is going to be check if the page was modified, if it was, it will write the page in the swap file(an OpenFile object defined as a global variable in the system.h and system.cc files). The page will be marked as not valid, because is not longer in the main memory, and the page table will be updated.

void
PageFault()
{
  PageReplacement *replace;
  unsigned int page;
  //Get the page who rised the exception.
  page=(machine->ReadRegister(BadVAddrReg)/PageSize);
  //Get the frame who's going to be swapped.
  TranslationEntry* swap_victim = replace->Select_Out(currentThread->space, page);
  // If the page was modified, write it in the swap file
  if (swap_victim->dirty)
    fdswap->WriteAt(
      &(machine->mainMemory[(swap_victim->physicalPage)*PageSize]),
      PageSize,
      (swap_victim->virtualPage)*PageSize);

  // Mark it as not valid, because is not longer in the main memory
  swap_victim->valid=false;

  TranslationEntry* nueva = (currentThread->space)->
    ReadEntry(page);

  fdswap->ReadAt(
      &(machine->mainMemory[(swap_victim->physicalPage)*PageSize]),
      PageSize,
      page*PageSize);

  //Update the page table
  nueva->valid = true;
  nueva->physicalPage = swap_victim->physicalPage;
}
Now what happens in the PageReplacement class (Replace.cc) code?. The Select_Out method will run the LRU algorithm that we previously tested in python to determine which page is going to be be write at swap. The method searches if the page is already in the queue, if it is, it'll just update its position. If it is not already in the queue, it's added at the beginning of the queue and the last element of the queue is swapped out. It is important to note that most of the methods used for the queue operations were implemented by us, because NachOS didn't have so much of them to work with.

TranslationEntry* PageReplacement::Select_Out(AddrSpace* space, unsigned int page)
{
 unsigned int swap;
 //Search if already in queue
 if(queue->Search(page)){
  //get the position in which is stored
  int pos = queue->IndexOf(page);
  //remove it
  queue->RemoveAt(pos);
  //put it at the beginning
  queue->Prepend(page);
 }
 else{ //if not in queue
  //remove the last element, the one who will be swapped
  queue->Prepend(page);

 }
 //The one at the end is the one who's going to be send to swap
 swap = queue->Remove();
 queue->Print();
        //Find the page table entry for the victim
 int out_entry = space->SearchPhysicalAddress(swap);
 TranslationEntry* victim = space->ReadEntry(out_entry);
  return victim;
}

Some of the implemented List methods are:

Search Method: 
Used to search for a value in the List, returns true if found, otherwise returns false.

template 
bool
List::Search(Item value)
{ 
 bool found = false;
 ListNode *ptr = first;
 while(ptr!=NULL){
  if(ptr->item == value){
   //std::cout << "Found";
   found = true;
  }
  ptr = ptr->next;
 }
 return found;
}

IndexOf Method:
Used to find the index of a given item from the list.

template 
int
List::IndexOf(Item value)
{ 
 ListNode *ptr = first;
 int index = 0;
 while(ptr!=NULL){
  if(value == ptr->item){
   return index;
  }
  index = index + 1;
  ptr = ptr->next;
 }
 return -1;
}

RemoveAt method:
Removes an item at a given index.

template 
void
List::RemoveAt(int index)
{ 
 ListNode *ptr = first;
 ListNode *ptr_next;
 int i = 0;
 if(Get(index) == last->item){
  std::cout << "Ultimo Borrado";
  last->item = NULL;
 }
 else{
  while(ptr!=NULL){
   if(index >= i){
      ptr_next = ptr->next;
      ptr->item = ptr_next->item;
  
   }
   i = i + 1;
   ptr = ptr->next;
  
  }
 }
}
Unfortunately we couldn't test this in our nachOS because we couldn't implement the TLB and PageTable, which was necessary to the performance of the algorithm.
Anyway, our NachOS code can be downloaded here:

Any doubt or suggestion, please feel free to comment.

References:
http://sopa.dis.ulpgc.es/wiki/index.php/Actividad_7:_memoria_virtual

2nd Practical Assignment - MMU


For the OS practical assignment we decided to implement a simulation of the MMU, in python programming language. In this post, I will show the code, an explanation of it, and screen captures of the results.

Page Table

As we already know, the page table is used to do memory translations from logic to physical addresses which are understandable to the drivers.

To begin, the script has as parameters first, the size of the address range, namely, the number of bits the computer has to assign addresses. The second is the size of the main memory, and the third the frame size.

The script starts verifying the parameters, to check if they meet certain conditions. Then some of these values are passed as attributes of the class PageTable and calculates the number of bits belonging to the logical address to get an idea of how many rows the page table will need.

Now to generate the page table, we use a "for" to add to a matrix the rows of the Page Table. To tell how many rows it must add, it uses the value from the logical addresses and raises the 2 to the power of that number. Maps the frames of the main memory, and when it ends, maps it again in the spare addresses, with this we achieve that any accessed logical address will have an assigned physical address.


 def __init__(self, tamDireccionVirtual,  memoriaP, tamFrame):
  if (memoriaP%2 != 0) or \ # El tamaño de la memoria principal debe ser un multiplo de 2
  (tamFrame%2 != 0) or \ # El tamaño de las frame debe ser un multiplo de 2
  ( memoriaP%tamFrame != 0) or \ # El tamaño de la memoria principal debe ser un multiplo de el tamaño de la frama
  ( pow(2,tamDireccionVirtual) < tamFrame) or \ # El tamaño del frame debe poder contenerse en el rango de direcciones
  ( tamDireccionVirtual%4 != 0): El rango de direcciones debe ser multiplo de 4
   print 'Error'
   return

  self.tDVirtual = tamDireccionVirtual; # bits
  self.ram = memoriaP # bytes
  self.tFrame = tamFrame # bytes
  self.numeroMaximoFrames = 300
  #[Direccion fisica, bit de presencia, bit de persistencia, dirty bit, lectura, escritura, modificacion]
  self.pageTable = []

  # Calcular el numero de direcciones logicas que se pueden tener
  self.numDireccioneslogicas = self.tDVirtual - math.log(self.tFrame,2)

  # Generar la page table
  print 'Numero de registo logico   direccion fisica'
  contadorDirFis = 0 # Este contador es utilizado para asignar las primeras direcciones a la memoria principal en la tabla
  for i in range(0, (int( pow( 2,self.numDireccioneslogicas)) - 1) ):
    if i < self.ram/tamFrame :
     self.pageTable.append([contadorDirFis, 1,0,0,0,0,0])
    else:
     self.pageTable.append([contadorDirFis, 0,0,0,0,0,0])

    if( contadorDirFis < (self.ram-self.tFrame) ):
     contadorDirFis = contadorDirFis + self.tFrame
    else :
     contadorDirFis = 0

    print "%s %s"%(i,self.pageTable[i])

  print 'Page table creada.'

The result is the following:

The Page Table is in charge of translating addresses, so to achieve this, the method obtenerDireccionFisica receives a String parameter with a hexadecimal logical address of a certain size. The method splits the address and gets from it the address of the  page in the table and the displacement in memory inside of it, and converts it into an integer.To finish, the method searches for the page in the table, and verifies that this page is found on the main memory, otherwise it raises a "Page Fault".

 
 def obtenerDireccionFisica(self, direccionLogica ):
  direccionFisica = direccionLogica[0 : int(self.numDireccioneslogicas/4)] # Parte la direccion logica y obtiene la direccion del frame en la tabla 
                # Parte la direccion logica y obtiene la direccion de desplazamiento de la frame
  desplazamiento = direccionLogica[int(self.numDireccioneslogicas/4) : int(self.tDVirtual /4)] 
  if self.pageTable[int(direccionFisica, 16)][1] == 1: "Verifica que se encuentre en la memoria principal
   return  self.pageTable[int(direccionFisica, 16)][0]  + int(desplazamiento, 16) # Convierte las direcciones a hexagesimal y obtiene la direccion
  else:
   return "Page fault"

The result is the following:

TLB


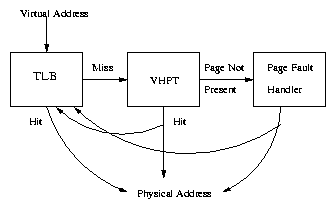
The TLB works as a cache memory to translate quicker the last used addresses, this memory is pretty quick, and all the rows are accessed simultaneously, which makes it more useful, the problem is, this memory is very small, so it works together with the Page Table to translate addresses.
The TLB receives as parameters the Page Table and the quantity of rows the TLB cache has, then it builds it   using the first rows of the Page Table.

 def __init__(self, PageTable, filas):
  self.pt = PageTable
  self.filas=filas
  self.table=[] #[ direccion de pagina, PID, sin usar, direccion fisica, N, D, V, G, vejes]

  for i in range(0,self.filas):
   self.table.append([i, 0, 0, self.pt.pageTable[i][0],0,0,0,0, 0])
   print " {} {}".format(i, self.table[i])
  print 'TLB creada'

Result:

To get the physical address, first the TLB splits the logical address in the page address and the displacement, then with a "for" cycle, searches if this address is in the TLB, if it is not there, it searches in the Page Table.

It is important to note, the page table must know which pages bring out, and which bring in the Page Table. For this every row has an "age" number which increments every time a page is brought to the TLB, so when it is necessary to take out a page, the TLB uses this number as an index to decide which one bring out, taking out one of the oldest pages.


def obtenerDireccionFisica(self, direccionLogica ):
  direccionDePagina = int( direccionLogica[0 : int(self.pt.numDireccioneslogicas/4)] , 16)
  desplazamiento = int( direccionLogica[int(self.pt.numDireccioneslogicas/4) : int(self.pt.tDVirtual /4)] , 16)

  vejes = 0
  for i in range(0,self.filas):
   if vejes  < self.table[i][8] :
    vejes = self.table[i][8]

  for i in range(0,self.filas):
   if( self.table[i][0] == direccionDePagina):
    print 'Direccion encontrada en la tlb'
    for e in range(0,self.filas):
     self.table[e][8] = self.table[e][8] + 1
    return   self.table[i][3] + desplazamiento

  print 'Direccion no encontrada en la tlb, buscando en la page table y actualizando la tlb ...'
  resultado = self.pt.obtenerDireccionFisica( direccionDePagina, desplazamiento)
  if resultado != "Page fault" :
   for i in range(0,self.filas):
    if vejes  == self.table[i][8] :
     for e in range(0,self.filas):
      self.table[e][8] = self.table[e][8] + 1
     self.table[i] = [direccionDePagina, 0, 0, self.pt.pageTable[direccionDePagina][0],0,0,0,0, 0]
     self.pt.pageTable[direccionDePagina][1] = 1
     break
   return resultado
  else:
   print "Se ha generado un {} moviendo datos y actualizando la tlb...".format(resultado)
   for i in range(0,self.filas):
    if vejes  == self.table[i][8] :
     for e in range(0,self.filas):
      self.table[e][8] = self.table[e][8] + 1
     self.table[i] = [direccionDePagina, 0, 0, self.pt.pageTable[direccionDePagina][0],0,0,0,0, 0]
     self.pt.pageTable[direccionDePagina][1] = 1
     break
   return self.pt.pageTable[direccionDePagina][0] + desplazamiento


Resultado:

miércoles, 2 de noviembre de 2011

domingo, 30 de octubre de 2011

2nd Theoretical Assignment - File Systems

Hi, in this entry i'm going to talk about performance of file systems.

As we already know a File System is a huge collection of directories and files which save all kind of information. File Systems are organized by directories which in turn can contain besides files, other directories or sub-directories.

A way of organizing a file system may be:
  • Using a 'root' to signal where in the disk the 'root directory' starts.
  • The 'root directory' points to 'user directories'
  • An 'user directory' contains an entry for every file
  • The file names need to be unique inside a certain user directory.

The system name for a file must be unique in the file system. In hierarchical file systems, the system name for a file is usually the "trajectory name" from the 'root directory' to the file.
Example: /home/ubuntu/myfile.txt

Directories in UNIX systems are organized keeping certain hierarchy as we can see in the following schematic picture:

Some utilities of File Systems according to Wikipedia are:

File systems include utilities to initialize, alter parameters of and remove an instance of the filesystem. Some include the ability to extend or truncate the space allocated to the file system.

Directory utilities create, rename and delete directory entries and alter metadata associated with a directory. They may include a means to create additional links to a directory (hard links in Unix), rename parent links (".." in Unix-like OS), and create bidirectional links to files.

File utilities create, list, copy, move and delete files, alter metadata. They may be able to truncate data, truncate or extend space allocation, append to, move, and modify files in-place. Depending on the underlying structure of the filesystem, they may provide a mechanism to prepend to, or truncate from, the beginning of a file, insert entries into the middle of a file or deletion entries from a file.

Also in this category are utilities to free space for deleted files if the filesystem provides an undelete function.

Some filesystems defer reorganization of free space, secure erasing of free space and rebuilding of hierarchical structures. They provide utilities to perform these functions at times of minimal activity. Included in this category is the infamous defragmentation utility.

There are two general strategies to store a 'n' bytes file.

1.   Assign 'n' consecutive bytes of disk space.
  • Downside: If a file size increases, it will probably move in the disk, which can affect performance.
2.   Divide the file in a certain number of blocks (not necessarily adjacent)
  • Generally file systems use this strategy with fixed size blocks.

Some of the most important features of files system utilities involve supervisory activities which may involve bypassing ownership or direct access to the underlying device. These include high performance backup and recovery, data replication and reorganization of various data structures and allocation tables within the filesystem.


Example of emulating a defragmentation algorithm:
http://forums.devshed.com/c-programming-42/defragmentation-algorithm-757280.html

References:
http://en.wikipedia.org/wiki/File_system
http://www.cecalc.ula.ve/bioinformatica/UNIX/node10.html

2nd Theoretical Assignment - Page Replacement

Hi there, in this post I will explain how the page replacement algorithms work.
So first, what is the page replacement algorithm for?

 In a computer operating system that uses paging for virtual memory management, page replacement algorithms decide which memory pages to page out (swap out, write to disk) when a page of memory needs to be allocated. - Wikipedia

In our nachos, the page replacement algorithm will decide which page is going to be swapped out in  order to allocate a new one. For this, Martin C. Rinard mentions two algorithms in his notes: FIFO, and LRU.

FIFO

FIFO means, like many of you may already know, First-In First-Out, so this algorithm is going to swap the first page brought into memory, regardless of whether it has been accessed recently or not.

An example would be:
Sequence: 1, 2, 3, 1, 4 (Using a 3 sized memory)
1-> [1]
2->[1, 2]
3->[1, 2, 3]
1->[1, 2, 3] #1 is accessed again
4->[2, 3, 4] #And yet is swapped in the next turn

This is a downside of the algorithm, it may eject a heavily used page.

A pseudo-code for this algorithm would be:
  
fifo(page):
   #If the memory is not full yet
    if len(memory) < memory_size:
       #And the page is not already in memory 
        if page not in memory:
            #Add the page to memory
            memory.append(page)
    #If the memory is full
    elif len(memory) == memory_size:
        #And the page is not already in memory
        if page not in memory:
           #swap out the first added page ( index 0 on the queue)
            swap_out = memory.pop(0)
           #Add the page to memory at the end
            memory.append(page)

An example run of a python script using this pseudo-code and data from the OS notes:

LRU:

LRU, Least Recently Used, works as it sounds, it will swap out the least page used. For this the algorithm uses a queue, in which the pages brought to memory will be added to the beginning of the queue. When a page fault occurs, the algorithm swaps out  the last page on the queue.
Sequence: 1, 2, 3, 1, 4 (Using a 3 sized memory)
1->[1] - [1]
2->[1, 2] - [2, 1]
3->[1, 2, 3] - [3, 2, 1]
1->[1, 2, 3] - [1, 3, 2] # 1 is accessed, the queue updates
4->[1, 4, 3] - [4, 1, 3] #a page fault occurs, 2 is the least recently used, so it's ejected.

A pseudo-code for this algorithm would be:
  
LRU(page):
    #If the memory is not full yet.
    if len(queue) < memory_size:
        #And the page is not already in the queue
         if page not in queue:
            #Add the page to the beginning of the queue.
            queue.insert(0, page)
       #else if its already in the queue
        else:
           #Pop the page out, and add it at the beginning
            queue.pop(queue.index(page))
            queue.insert(0, page)
    #If the memory is already full
    if len(queue) == memory_size:
       #And the page is not in the queue
        if page not in queue:
            #swap out the last page in the queue, and add the new one to the beginning
            swap_out = queue.pop()
            queue.insert(0, page)
       #Else if it's already in the queue
        else:
            #Pop the page out, and add it at the beginning
            queue.pop(queue.index(page))
            queue.insert(0, page)

An example run of a python script using this pseudo-code and data from the OS notes:


LRU Vs FIFO

To test the algorithm, a sequence of 20 random pages were used to obtain averages between 100 samples. Five different pages were used(from 1 to 5).


So, according to this, in average FIFO gets more page faults than LRU in every memory size bellow 7.
This also concludes an interesting fact, at n + 2 size(n being the number of different pages), both algorithms bring the same results. So in this case in which, n = 5, from 7 onwards the page faults in both LRU and FIFO will be the same providing the sequence is the same for both.

And that's all for the page replacement, if you have any doubt or observations, feel free to write in the comment section bellow. 


References:


2nd Theoretical Assignment - TLB and Page Table

Paging

In the first computers, memories were reduced and normally programs wouldn't fit in them, slow algorithms were used, and to address this problem the memory was divided in pieces and secondary memories were used to load some of this pieces of processes into the main memory, and the others into a secondary memory for later use. This is called memory overlay. 

Even so, this still brought many problems to programmers because they had to work with the address of the overlays which brought as consequence the idea of paging. Paging is a method to separate the memory space from addresses and addresses from memory in the main memory of the computers, this idea was came to be in 1961 from a group of researchers in Manchester, England.
In paging, the address space is divided in pieces, called pages and the physical memory is divided in pieces of the same size called frames which allows large spaces of memory to be reduced in small pieces.

An address space may feature a n quantity of bits which can address 2^n addresses. Dividing this address space in pieces decreases this number, which makes the administration of this address space more simple.

The address space is also divided, for example, if we have an address space of 32 bits, and frames of 4kb, which is equivalent to 2^12 physical memory addresses, the last 12 bits of the address are assigned to the addressing inside the frames, and the other 20 at the left, are assigned to the frame's address space, leaving 2^20 addresses managed by the operating system, doing a more lighter job.

 
0000 0000 0000 0000 0000  0000 0111 1111
|_____________________|   |____________|
                |                                             |
                |                                             v
                |                    Memory location within the page
                v
         Page Number

Another attribute of paging is its abstraction, which allows a logical address to point at a page even when the page is not in the range of addresses of the memory frames, this can take advantage of all the logical address space in the computer.

Page Table

The page table is a structure which  performs the translation of logical addresses into physical addresses from the memory. Besides this, the page table keeps track of the pages, and improves the security of the pages, managing the writing, reading, and executing permissions

The most common fields in a page table are:
The address of the frame in memory
Presence bit used to know tell if the page is found.
The dirty bit used to know if a file has been modified in the main memory, and must be updated in secondary memory.
Persistence bit
Writing, reading and modification bit.


To translate logical addresses into physical addresses, the logical address is divided in the number of pages and the displacement, then the number of pages is used to find it inside the page table, once the address of the page is found , the displacement is added to the memory inside the page, and that's how the physical address is found.


Despite the number of addresses managed with paging being decreased, the page tables can be extremely large, so different techniques are used to organize this tables.

Page Fault

If the presence bit in the memory marks that is not present in the main memory, the MMU responds by rising and exception(commonly called page fault). If the page is found in the swap space, the operating system will invoke an operation called page replacement, to bring the page required to the main memory. This operation takes several steps and it may be time-consuming.


TLB

Even if tables decreases the quantity of managed addresses, these can be very large and slow, so a cache memory is used. This memory can reside between the memory and the cache itself or between the cache and the main memory unit. This memory is very fast, but small. Typically the TLB has between 2 and 2048 entries. So, before accessing to the page table, the hardware looks in the TLB, if the logical address is there, so is the corresponding physical address and it's accessed directly. If it's not there, the hardware looks in the page table, and then the memory, and saves the access in the TLB

Algorithm for accessing a virtual address:


  1. The MMU receives from the CPU a dir -virtual.
  2. MMU searches( in parallel) dir -virtual in the TLB memory. If it's successful go to step 7.
  3. Search the address in the page table. If it's successful go to step 6, if else, generate a page fault.
  4. Execute a strategy of page replacement
  5. Swap pages between disk-memory
  6. Delete the TLB and update the page table.
  7. Update the TLB
  8. Generate a physical address and search for data in memory. If it's not successful, consult for data in the page table.
  9. MMU returns the requested data.


References:
http://nits.com.ar/uadeclasses/clase11.html
http://viralpatel.net/taj/tutorial/paging.php
http://www.pling.org.uk/cs/ops.html
http://es.wikipedia.org/wiki/Paginaci%C3%B3n_de_memoria
http://es.wikipedia.org/wiki/Translation_Lookaside_Buffer
http://expo.itch.edu.mx/view.php?f=os_42#page6

Organización de computadoras. Un enfoque estructurado, 4ta Edición - Andrew S. Tanenbaum

miércoles, 14 de septiembre de 2011

Dining philosophers(Implementation)

Good Day!, in this post I'll explain how our implementation of the dining philosopher works. For this, we made 3 different versions of the problem in python to test the algorithm.

1st
This class is the core of the program, its the base of what every philosopher does with his "forks". In this version of the dining philosophers, all they do is take the left fork, and then the right fork, and eat in case they are hungry.This is the most basic logic of what the philosophers would do. This behavior causes some deaths, or a DeadLock to generate.

class filosofo:

 def darVida(self):
  while(True):
   if self.hambre > self.limiteHambre :
    self.tenedorIzquierdo.acquire()
    self.actual[0]=1
    self.tenedorDerecho.acquire()
    self.actual[1]=1
    while self.hambre > self.limiteComer :
     self.noHagoNada()
    self.tenedorIzquierdo.release()
    self.actual[0]=0
    self.tenedorDerecho.release()
    self.actual[1]=0
   time.sleep(1.0)


2nd
This is the code for the algorithm using turns, which makes every philosopher wait for his own turn, if its the turn of philosopher A, then he will eat until he feels satisfied, and if he doesn't he will just pass his turn. This logic works to avoid deadlocks or the deaths of some philosophers depending on the philosophers on the table. Should the number of philosophers increase, every philosopher would have to wait more time and eventually will die.


class filosofo:


def darVida(self):
while(True):
if self.hambre > self.limiteHambre :
if self.ficha > 0 :
self.tenedorIzquierdo.acquire()
self.actual[0]=1
#print( "Soy el filosofo %d y tengo mi tenedor izquierdo :D"%(self.identidad) )
self.tenedorDerecho.acquire()
self.actual[1]=1
while self.hambre > self.limiteComer :
self.noHagoNada()
#print( "Soy el filosofo %d estoy comiendo :D"%(self.identidad) )
self.tenedorIzquierdo.release()
self.actual[0]=0
self.tenedorDerecho.release()
self.actual[1]=0

if self.identidad < len(mesa.filosofos) and self.ficha == 1:
self.mesa.filosofos[self.identidad+1].darFichaT()
self.ficha=0
elif self.identidad == 5 and self.ficha == 1:
self.mesa.filosofos[0].darFichaT()
self.ficha=0
time.sleep(1.0)

def noHagoNada(self):
time.sleep(1.0)
return;


3rd.
The next implementation is alternate tokens, in which every two or three philosophers are assigned with alternate tokens. They can eat for an amount of time(which we call turn). Every turn, the philosophers who posses a token have to pass the token to the one at his right. This will cause the philosophers to alternate their turns,and subsequently, less time to wait . The parameters that affect this solution are the speed in which each philosopher eats in his turn, and the speed in which each philosopher will be hungry again, in case of getting more hungry in one turn in which the token is lost, then at some point the philosophers will die. Otherwise if the eating speed is more than the speed of digestion, then they will be always on a common range of hunger.

class filosofo:


def darVida(self):
while(True):
if self.hambre > self.limiteHambre :
if self.ficha > 0 :
self.tenedorIzquierdo.acquire()
self.actual[0]=1
#print( "Soy el filosofo %d y tengo mi tenedor izquierdo :D"%(self.identidad) )
self.tenedorDerecho.acquire()
self.actual[1]=1
while self.hambre > self.limiteComer and self.contadorFicha < self.turnos:
self.noHagoNada()
self.contadorFicha = self.contadorFicha + 1
#print( "Soy el filosofo %d estoy comiendo :D"%(self.identidad) )
self.tenedorIzquierdo.release()
self.actual[0]=0
self.tenedorDerecho.release()
self.actual[1]=0
if self.ficha > 0 :
if self.contadorFicha < self.turnos :
self.contadorFicha = self.contadorFicha + 1
else:
if self.identidad < 5:
self.mesa.filosofos[self.identidad+1].darFichaT()
self.ficha=0
self.contadorFicha=0
elif self.identidad == 5:
self.mesa.filosofos[0].darFichaT()
self.ficha=0
self.contadorFicha=0
time.sleep(1.0)


And here the links to the codes:
http://maxkalavera.iblogger.org/filosofos_base.py
http://maxkalavera.iblogger.org/filosofos_ficha.py
http://maxkalavera.iblogger.org/filosofos_alternados.py

See Ya!